ROBYN SALT
FINE ART STUDENT
This is a digital copy of my Project Report. The full copy can be found in my Google Drive folder.
INTRODUCTION
As part of my final evaluation I will be assessing the progress I have made between the beginning and end of my project. Writing this during the last two weeks before my deadline as part of my final EPQ task, I have a reflective viewpoint of all successful and unsuccessful tasks that I had set myself during the past.
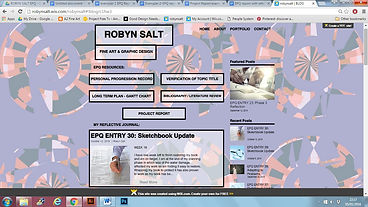
Figure 1, Blog Screenshot
Alongside my report, I have written a detailed reflective journal. This takes the form of a succession of blog posts which I added to a new blog page on an existing personal website (see Figure 1). The website design platform Wix allowed me to design my own blog yet gave me a strong framework. I had constant access to this page on short notice from my laptop or phone meaning I could produce posts more frequently. Therefore, I used this method to write detailed notes and plans about my overall progress more often than once a week. I believe that using this resource increased my motivation as I incorporated the blog updates into my weekly routine and begun to notice my ability to successfully meet targets. Fulfilling the targets I set myself boosted my work ethic, something that encouraged me to produce a higher quantity and quality of work as the weeks went on.
As well as this, I purchased a sketchbook to chart the more physical progresses of my project. This method allows for a more visual progression which I found to suit my artefact based project. The sketchbook allowed for display of imagery, photos, prints, blueprints and other items which I couldn’t chart as easily on my blog. However, I found the sketchbook to be more difficult to access as I couldn’t always have it at hand. This was inconvenient when I was out of the country or away from home, whilst with the blog I could produce updates at any point. Presenting my images and text in the sketchbook was also more laborious as I had to use supplies including fineliners, spray mount, scalpels and metal rulers for a clean aesthetic. This may have put me off completing tasks as times as each sketchbook entry took more time and effort. My awareness of the tight deadlines I had set myself did keep up my motivation levels, as I had charted individual phase deadlines at the beginning of my book which I could easily refer to.
Another method I used to chart my progress was the Gantt chart. By using the program Google Sheets I could produce a table of the tasks. These included tasks that I had already completed and evaluated in terms of whether I had met the deadline, how easily I had managed to meet it and whether I should take forward my work ethic for the future tasks I’d then set myself. Colour coding the weekly progress I’d make with each task of each phase allowed me to easily record progress I’d made and progress to make. This was also easy to access and was quick to fill in whilst it played a vital role in my ability to meet targets.
For my overall project aims are submitting a project that fulfils the assessment objectives to the best of my ability, fulfils my own personal project aims, is handed in on time due to strong overall planning and enjoying my project. In detail, I studied the assessment objectives before starting the project as well as adding a copy of them to the beginning of my sketchbook to refer to with each sketchbook entry. I used this method to refresh in my mind the ways in which my work should fulfill the expectations of the examiner to improve my work quality. In terms of fulfilling personal project aims, I have set myself the goals to research the processes involved in creating a darkroom for photography film development and then to successfully construct this to be able to produce a successful print. As well as this, I aimed to set myself weekly targets for each phase to be completed on the deadlines I’d set myself. For me and my natural way of working, a strict deadline is the most certain way to meet the hand in date. Therefore this aim was critical to my project. The aim that is most personal to my project is to research the processes involved in creating a darkroom for photography film development and then to successfully construct this to be able to produce a successful print. As an artefact based project, the final outcome is a physical piece of work. This leads onto my aim to hand in on time due to strong preplanning. My ability to meet the deadline was important otherwise my ability to plan would evidently seem weak which goes against assessment objectives. Improving my ability to plan was extremely important for this self-directed project. My final objective of enjoying the project is also important. Being given the chance to develop a personal interest in this way meant I was more focused on the darkroom as a task as I was aware of the fact it was being assessed. I didn’t want this to detract from the creative photographical processes of the project which are what I find most interesting. I wanted to ensure that despite other elements, that I’d enjoy learning a new skill in the area of my greatest interest.
When thinking of my topic ‘Constructing a Working Darkroom’ I preplanned five time frames for each action I’d need to complete for the project. This has made my progression clear as I could easily categorise planning from initial ideas or reflection from construction and so on. This also made the workload more manageable as I could work within the deadlines of a smaller timeline making targets easy to set and future progress easy to predict.
PHASE ONE
The first part of my project I titled ‘Initial Ideas’. Before starting this I saw this phase as a chance for me to pinpoint my ideas and aims for the project as well as finalise topic and title. The aims of this phase were to decide on a suitable topic and title as well as to produce and reflect upon my practise presentation.
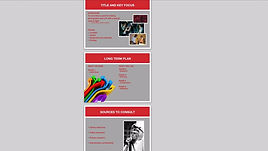
Figure 2, Practise Presentation Screenshot
I begun spending equal time between blog and book writing of my first thoughts and deciding on a topic which suited my interests and supported my future further education and career choice in the Fine Art industry. I also prepared a powerpoint (see Figure 2) to be used as a practise presentation in class in preparation for my final presentation. In conjunction with this, I designed the most suitable feedback form which would give me a balance of qualitative and quantitative data due to open and closed questions as well as rating scales. From this I formatted my data into tables and graphs which would then display the strengths and weaknesses of my presentation according to my audience. I concluded that the information content was the least successful aspect of my project and reflected upon the ways in which my information was presented in too vaguely or in too much detail. I decided upon on refinements that would make a presentation more user friendly by improving the clarity which I would revisit before my final presentation. I ended the phase with a small reflection of the methods I has used to far to successfully meet the deadline of the phase before progressing to the next phase with the aim to continue with the same work ethic.
PHASE TWO
For my second phase I completed the research aspects of my project. I aimed to research a variety of different sources including imagery, books, articles, videos, expert opinions and websites and to extract the most relevant information to take forward to future phases.
Figure 3, Initial Imagery
My largest source of information was the internet as darkroom printing has been long replaced by digital photography with instant access to photos meaning many sources such as books are no longer being published on the topic of the dying art. This became evident when searching for books on my topics subject matter in two different libraries. I was looking for a description of the processes of the darkroom whilst the closest information that I gathered to this was a history of the darkroom.
Instead I consulted the internet where I begun searching for imagery (see Figure 3) to give me a visual of the darkroom that I would need to construct to produce my final print. For my first more detailed sources I researched for darkroom related articles online. I saw these as a good starting point for my research as these sources would be the most reliable by being written by more reputable academics, giving me a good first understanding of the darkroom. However, the articles lacked detailed information from which I could take forward to construct a darkroom as there were no visual aids. From this I began to study videos from the website Youtube. These educated me on the process as I could watch other professional darkroom developers use their processes from which I took screencaps from and extracted relevant steps and equipment.
I found that other professional developers would be a useful source for me to consult as they would have a large bank of information that I could access due to their personal experiences. This proved to be true when coincidentally meeting a fine art lecturer whilst on a University tour. I was unprepared and unsure of questions to ask so I planned to find another professional closer to home. I contacted Alex Flax, owner of an analog photography shop named Mr Cad in London who I concluded would be the closest and most knowledgeable source of information to me. In our interview he answered all of my prepared questions as well as providing me with darkroom supplies for my future phases.
After the interview I still didn’t feel confident enough to begin construction so I continued research online and took notes from a few relevant websites. Some of the websites conveyed information differently by listing steps as instructions. I found this easier to work from as the processes of the darkroom were laid out in clear format to follow. From this I decided to read a few other books, this time buying the few darkroom manuals that I could find online, including three books suggested by the experienced developers I’d talked to. I found three of the books to be my most useful resources as they were written for amateurs and when combined, contained all of the tasks that would lead me towards my end goal of a successful print. I cut the steps out of the books and transferred them to my own book so that I could examine them in more detail and make notes from them, extracting the most relevant information.
PHASE THREE
I took forward this relevant information to my third phase titled planning. For this I applied all of the knowledge that I had acquired through extensive research and divided my darkroom plan into three categories named design, equipment and process.
To design my darkroom I used the tips provided by my book research. This began with selecting the most appropriate room to construct in according to set variables. The most important variable to me was that the room wouldn’t disturb me or families way of living or that I’d be disturbed whilst working in the darkroom. Based on this, I selected my small unused kitchen that’s positioned further away from the rooms that are used. I took it’s measurements and drew up my own blueprints based upon my knowledge of scale drawings taught to me in secondary school. The most important element of the blueprints were to have a circular motion between dry side and wet side to avoid contamination of the prints. I also had to bear in mind the equipment that required electricity or a water source to be placed by either a socket or sink.
Figure 4, Ebay Items Screenshot
I then moved onto planning of my equipment by drawing up a list of items I already owned and items to acquire. The internet again played a role in my project as I had to find sellers online who would stock the equipment I needed. This way I could find guaranteed and reliable sources quickly compared to putting an advert in a local newspaper asking for help for example. I found many sources using online websites Ebay, Amazon, Gumtree as well as independant darkroom equipment retailers. After evaluating these according to distance, price, condition, reliability of seller and most importantly the equipment content I settled on a package deal from Ebay (see Figure 4). Although the items were used and had to be collected, the distance to travel was feasible and it was the cheapest, as well as having a highly rated seller and covering all of the gaps in my equipment list.
For my final stage of planning I had to design my process. As my manual style books covered all of the necessary stages I took forward the most relevant but minimal information. I wanted my first attempt to have minimal steps to avoid confusion and to be easier to follow as I can only work at the level of an amateur developer. I cut steps that weren’t vital to the process such as pre-testing for any light leaks as this would fade my print but would still show that I had taught myself the essential developing process used to produce the print in the first place. I listed the steps in an easy to read table which I then printed off and used for phase four.
Again, for this phase I am happy with the progress made as I met all small phase target deadlines as well as finishing the overall phase with a positive outlook to move onto construction and to put the skills I’d learnt so far into practise.
BOOK RESTORATION
Before I could move onto my next phase I ran into a large problem. When transporting my book to college in my bag my bottle leaked, causing its pages and all of my imagery and writing to become unreadable due to water damage. I decided upon three solutions to my problem before deciding to purchase a new sketchbook and copy or salvage the work from my damaged book. Together the three phases worth of work spanned a time period of nine weeks which I planned to fit into a six week restoration phase. Six weeks was the maximum amount of time that I could afford to spend on this after assessing how much still needed to be completed against how much time I had left. When I first divided up my time for the project I had scheduled ‘buffer weeks’ to take place at the end of each phase in case of unexpected schedule conflicts. I combined the buffer weeks for phases three, four and five as well as cutting the time for future phases to schedule this new phase. I also asked to extend my deadline for a further week, setting myself a new hand in date yet this would still be handed in before breaking up for the Christmas holidays.
Due to successful planning techniques through use of blog and Gantt chart I met my restoration deadline. To avoid further damage to my work I would carry my book in a protective covering. Altogether the experience has proven that my ability to plan and schedule my time are of a high enough level to face six weeks worth of unexpected workload. Finishing the project on time meant I felt highly prepared for my next phase and I continued with the same level of commitment to my EPQ studies.
PHASE FOUR
The aims of phase four were to construct and use my darkroom to produce a successful print. This would be the phase that all my initial workings built up to in which I would complete my personal project aim.
Figure 5, Photo of Wet Side Equipment
Figure 6, Photo of Dry Side Equipment
I felt that I now had fully planned all of my darkroom processes, equipment and design so moved onto its construction. I began by laying out all of my equipment and putting the items onto the left side (from entrance into the room via the hallway door) which would be the dry side of my developing process or onto the right side which would be the wet side. For example, I placed my chemicals (see Figure 5) onto the wet side as they are liquids and would affect the quality of my paper if on the dry side due to contamination. I went on to arrange my dry side equipment. This included my enlarger (see Figure 6) which I plugged into the power and tested to see that it was fully functional and produced light.
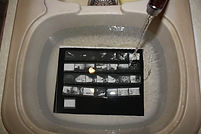
Figure 7, Photo showing Chemical Concentration Measurement
Before beginning any type of development I had to make preparations of my chemical concentrations (see Figure 7).
Figure 8, Photo of Undeveloped Film Canister
After the darkroom had been constructed I then begun to follow the process instructions I had set myself. To be able to make my final print there were three key steps to follow. Firstly I had to develop the film from my camera (See Figure 7) which held all of the undeveloped images. I completed the steps I had written and as I had a good understanding of all processes and equipment and followed along with the steps of the video tutorial research from Youtube if I got confused, I successfully developed and dried my strips of negative film. After being developed the film is referred to negatives due to the black and white tones being swapped around so that in print development when the tones are again swapped, the tones will be correct.
Figure 9, Photo of Contact Print Washing
From this I then cut the film into strips no longer than 30cms and began to work in the dark, placing them on top of my light sensitive paper. I used the suggested timings provided by my research sources and set the enlarger. After being developed by the light underneath the project I developed it with the chemical and left to wash (see Figure 9) before I chose the images I wanted to develop to full size prints.
Figure 10, Photo of Grain Focusing
After then choosing an image, the final print development takes place. I slotted the desired negative into the enlarger, and turned it on to reveal the image underneath. I placed the easel here to adjust the size of the image to suit the paper size before adjusting to the correct focus using the grain focuser (see Figure 10). Afterwards in darkness I followed the same timings for my contact print and developed the photo sensitive paper first with light then chemicals.
Following the steps I had designed in my research and planning phases allowed me to produce a working darkroom that produced successful prints (see Figure 11). This outcome was my most important personal project aim.
Figure 11, Photo of my Successful Print Outcome
PHASE FIVE
For my last phase of work I decided that to understand what I had or hadn’t achieved with my project by dedicating time to look back and reflect.
A summary of my project that I had to first complete was my final presentation. I decided to present it as a static display as my project is visual and I wanted to be able to talk with each viewer about my imagery and final outcome in person. For this I reflected back to my practise presentation to reiterate that my aesthetics and enthusiasm were my strengths and information content my weakness. I then aimed to improve upon this element of my display by using only small amounts of the key information and prepared clear, concise yet informative answers to questions I was likely to be asked. I also upheld my aesthetics by using imagery and colours that reflected how excited my project made me. To prepare I also produced an equipment list of all of the items I needed to bring to display such as pens and a pen pot to be used by the viewers to fill out feedback forms. I also designed a rough sketch of the placement of all my information and items on my table and boards to make set up on the day quicker and easier.
I personally believe that my presentation was a success as I seemed to engage many viewers who were drawn in by the aesthetics of my display. I had many interesting conversations and managed to spread awareness of a dying art that other people my age lacked knowledge of. When reflecting on the presentation according to my feedback forms, I believe my information content improved as many judged that I included the right information. The biggest issue this time was a part of my aesthetics as some of the text was a colour that was too hard to read. In conclusion to this, all of the participants believed that my project was in the end, a success.
FINAL THOUGHTS
My EPQ project has been a great success as I have achieved all initial aims and enjoy being able to put the skills I have learnt into practise as a creative hobby. The fact that I self-taught myself such a complex skill has proven to me that I can handle long term projects that require time and effort. This makes me more confident to take on the workload that I’ll have at university as I know that I have the skills needed to complete such tasks.
I have had problems with time management throughout my A Level education, especially due to having two full coursework subjects. However, this project has taught me to change the ways I plan ahead by producing long term plans. My EPQ has positively affected the ways I approach my other subjects and I feel that my progress in my coursework studies has been more steady and controllable since. I believe this is one my main successes.
This experience has improved skills that I already had as well as teaching me new skills. I have improved planning in the long term by being introduced to a new method of Gantt chart recording. I had also had practise at dealing with the unexpected which can endanger the success of my work by learning to not panic but to think methodically, critically and realistically to form the solution. I have also picked up new practical skills of budgeting, blueprint drawing and interviewing which will help in day to day life in terms of expenditure, designing and researching.
In the future, I’d like to expand upon what constructing in a darkroom has taught me. The project has opened avenues for me into colour darkroom printing, professional photographic techniques or professional photography. If I were to encounter such a project again I would take forward my planning techniques such as the idea of the phases as these were essential to me when organising my progression. I’d also bear in mind my weakness including the information content of my work to ensure that next time I could carry out a project I have absolute confidence in.
BIBLIOGRAPHY
Wix
Available: http://www.wix.com/.
Last accessed 5th Dec 2015.
Ebay
Available: http://www.ebay.co.uk/.
Last accessed 5th Dec 2015.
IMAGE SOURCES
Figure 1
Blog Screenshot
My own imagery
Available: http://robynsalt.wix.com/robynsalt#!blog/c1hw3/Page/2.
Last accessed 5th Dec 2015.
Figure 2
Practise Presentation Screenshot
My own imagery
Screenshot from Google Slides
2015
Figure 3
Initial Imagery
Freitas, M. Darkroom self-portrait.
Available: https://uk.pinterest.com/pin/507992032946150521/.
Last accessed 05/12/2015.
Figure 4
Ebay Items Screenshot
Ebay (2015)
Last accessed: 05/12/2015
Figure 5
Photo of Wet Side Equipment
Mw own imagery
2015
Figure 6
Photo of Dry Side Equipment
My own imagery
2015
Figure 7
Photo of Chemical Concentration Measurement
My own imagery
2015
Figure 8
Photo of Undeveloped Film Canister
My own imagery
2015
Figure 9
Photo of Contact Print Washing
My own imagery
Figure 10
Photo of Grain Focusing
My own imagery
Figure 11
Photo of my Successful Print Outcome
My own imagery
2015